yum安装以下包
yum -y install zlib-devel openssl-devel perl hg cpio expat-devel gettext-devel curl curl-devel perl-ExtUtils-MakeMaker hg wget gcc gcc-c++ xmlto
更换git版本
yum remove git
Loaded plugins: fastestmirror, security

Setting up Remove Process

No Match for argument: git

Repository updates is listed more than once in the configuration

Repository extras is listed more than once in the configuration

Loading mirror speeds from cached hostfile

Package(s) git available, but not installed.

No Packages marked for removal
安装git2.6.0
wget https://www.kernel.org/pub/software/scm/git/git-2.6.0.tar.gz
解压git
tar zxvf git-2.6.0.tar.gz
安装git环境
wget http://cfhcable.dl.sourceforge.net/project/asciidoc/asciidoc/8.6.9/asciidoc-8.6.9.tar.gz
tar -zxvf asciidoc-8.6.9.tar.gz
cd asciidoc-8.6.9
./configure
make
makeinstall
编译git
cd git-2.6.0
make configure
./configure --prefix=/usr/local/git --with-iconv=/usr/local/libiconv
make all doc
make install install-doc install-html
echo "export PATH=$PATH:/usr/local/git/bin" >> /etc/bashrc
source /etc/bashrc
创建git的软连接
ln -s /usr/local/git/bin/* /usr/bin/
安装go get工具:
yum install -y mercurial bzr subversion
Centos/Linux下源码安装golang:
wget https://storage.googleapis.com/golang/go1.4.1.linux-amd64.tar.gz
tar -C /usr/local -xzf go1.4.1.linux-amd64.tar.gz
mkdir $HOME/go
echo 'export GOROOT=/usr/local/go' >> ~/.bashrc
echo 'export GOPATH=$HOME/go' >> ~/.bashrc
echo 'export PATH=$PATH:$GOROOT/bin:$GOPATH/bin' >> ~/.bashrc
source $HOME/.bashrc
go的命令需要做软连接到/usr/bin
ln -s /usr/local/go/bin/* /usr/bin/
安装编译ngrok
cd /usr/local/
git clone https://github.com/inconshreveable/ngrok.git
export GOPATH=/usr/local/ngrok/
export NGROK_DOMAIN="域名"
cd ngrok
生成证书
openssl genrsa -out rootCA.key 2048
openssl req -x509 -new -nodes -key rootCA.key -subj "/CN=$NGROK_DOMAIN" -days 5000 -out rootCA.pem
openssl genrsa -out server.key 2048
openssl req -new -key server.key -subj "/CN=$NGROK_DOMAIN" -out server.csr
openssl x509 -req -in server.csr -CA rootCA.pem -CAkey rootCA.key -CAcreateserial -out server.crt -days 5000
替换证书
cp rootCA.pem assets/client/tls/ngrokroot.crt
cp server.crt assets/server/tls/snakeoil.crt
cp server.key assets/server/tls/snakeoil.key
在国内需要修改配置文件
vi /usr/local/ngrok/src/ngrok/log/logger.go
将
log "github.com/alecthomas/log4go"
修改成
log "github.com/keepeye/log4go"
编译服务端(根据自己系统的来)
cd /usr/local/go/src

GOOS=linux GOARCH=386 ./make.bash(32位)
GOOS=linux GOARCH=amd64 ./make.bash(64位)

cd /usr/local/ngrok/

GOOS=linux GOARCH=386 make release-server(32 )
GOOS=linux GOARCH=amd64 make release-server(64位)
编译客户端
MAC OS 64位操作系统(32位系统把amd64改成386)
cd /usr/local/go/src
GOOS=darwin GOARCH=amd64 ./make.bash
cd /usr/local/ngrok/
GOOS=darwin GOARCH=amd64 make release-client
Windows 64位操作系统(32位系统把amd64改成386)
cd /usr/local/go/src
GOOS=windows GOARCH=amd64 ./make.bash
cd /usr/local/ngrok/
GOOS=windows GOARCH=amd64 make release-client
linux 64位操作系统(32位系统把amd64改成386)
cd /usr/local/go/src
GOOS=linux GOARCH=amd64 ./make.bash
cd /usr/local/ngrok/
GOOS=linux GOARCH=amd64 make release-client
ARM 平台
cd /usr/local/go/src
GOOS=linux GOARCH=arm ./make.bash
cd /usr/local/ngrok/
GOOS=linux GOARCH=arm make release-client
编译生成的客户端文件在ngrok的bin目录下
客户端配置文件
在放客户端的目录下新建 ngrok.conf 文件输入以下内容
server_addr: "域名:4443"
trust_host_root_certs: false
服务端启动
/usr/local/ngrok/bin/ngrokd -domain="$NGROK_DOMAIN" -httpAddr=":80"
客户端启动
ngrok.exe -config=ngrok.cfg -subdomain aaa 80 (windows系统客户端)
配置tcp转发
在ngrok.conf修改(注意只能用空格不能用tab,注意空格数量)
server_addr: "域名:4443"
trust_host_root_certs: false
tunnels:
 mstsc:
  remote_port: 服务器端口
  proto:
   tcp: 本机端口
客户端启动命令变成
ngrok.exe -config=ngrok.cfg start mstsc
客户端命令详解
1、tcp端口转发,外网端口随机
ngrok -proto=tcp 22
2、转发到局域网其他机器
ngrok 192.168.1.1:80
3、绑定顶级域名才可以,在dashboard中添加域名,将域名cname解析到ngrok.com
ngrok -authtoken 秘钥 -hostname test.ngrok.com 80
配置文件命令详解
server_addr: "test1:4443"
trust_host_root_certs: false
tunnels:
 mstsc:
  auth: "user:password"
  remote_port: 8080
  proto:
   tcp: 8081
 test.test1.com
  proto:
   http: 80
mstsc表示转发服务器8080端口到本地8081,同时要求验证
test.test1.com表示转发服务器端口到本地80
参数:
authtoken: 用于设置登录ngrok的授权码,可以在ngrok首页的dashboard中查看到。
inspect_addr: 用于设置监听ip,比如设置为 0.0.0.0:8888 意味着监听本机所有ip的 8888 端口上
以下是tunnels之后的参数
proto: 指定本地地址和端口 (必填)。
subdomain: 指定二级域名,如果没有配置,ngrok会默认生成一个与隧道节点一样的名字的二级域名。
auth: 用于在http(s)中身份认证。
hostname: 指定顶级域名。
remote_port: 用于在tcp隧道中指定远程服务器端口。
错误处理
1、gopkg.in/inconshreveable/go-update.v0 (download)卡住不动
原因:git版本过低导致
解决办法:卸载自带的git1.7.1,安装git2.2.1并将git添加到环境变量中
2、……Failed to read valid http request: malformed HTTP request……
检查 ngrok.cfg 文件里的端口号是否与 Listening for control and proxy connections on [::]:4443 后的端口号一致。
3、……Failed to read message: remote error: bad certificate……
检查 ngrok.cfg 文件里域名是否与你建立证书时的域名一致。
检查客户端机器系统时间,是否为当前年月日。
服务器端开机自启
新建ngrok
vi /etc/rc.d/rc.local
将以下内容写入ngrok
/usr/local/ngrok/bin/ngrokd -domain="$NGROK_DOMAIN" -httpAddr=":26400" &
查看端口占用情况
netstat -tuanp
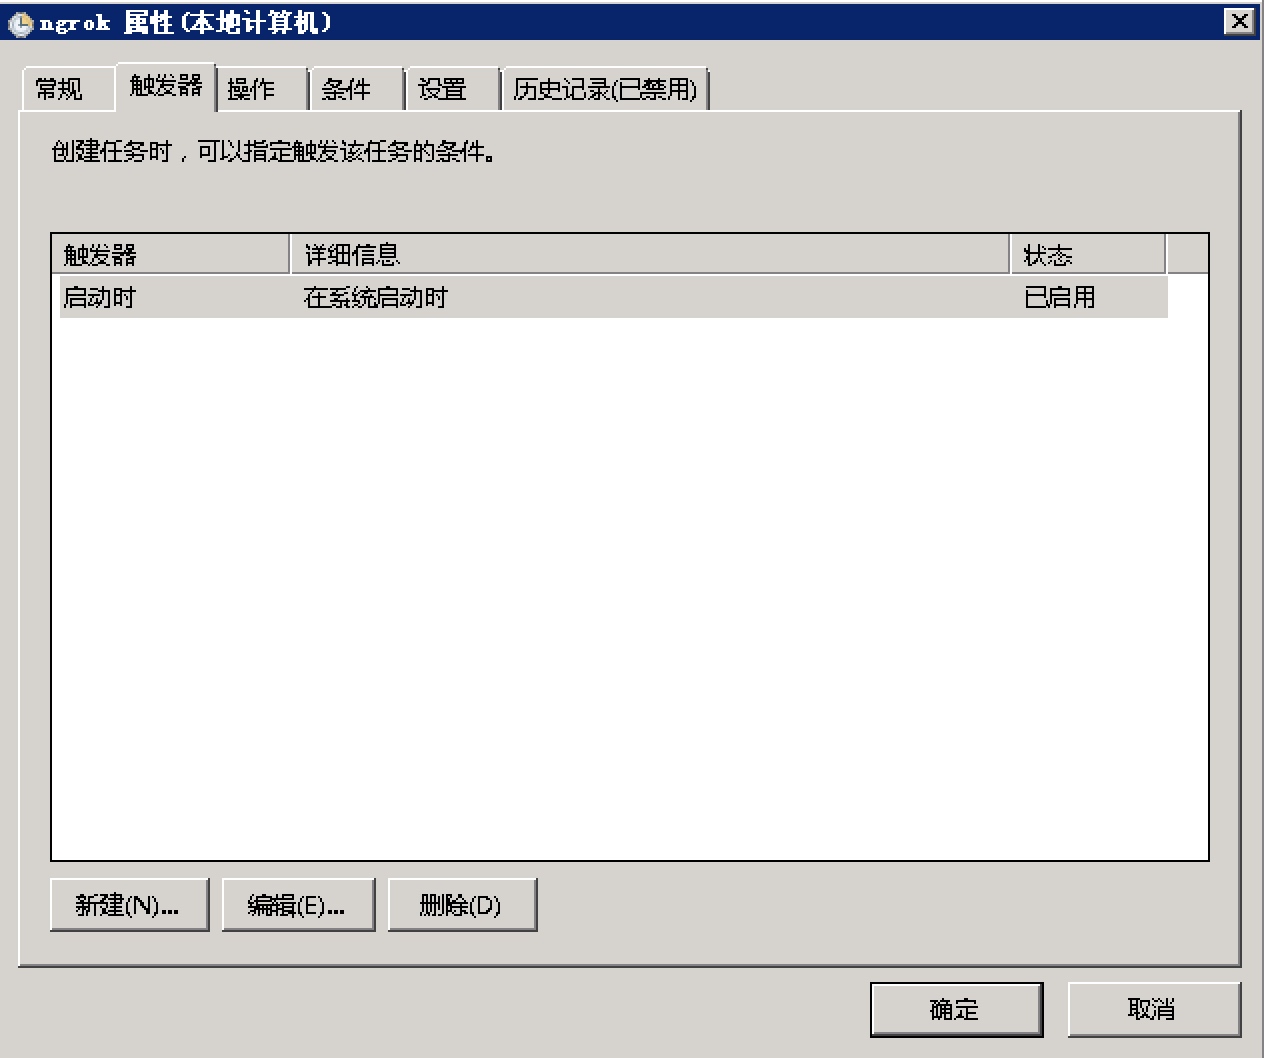
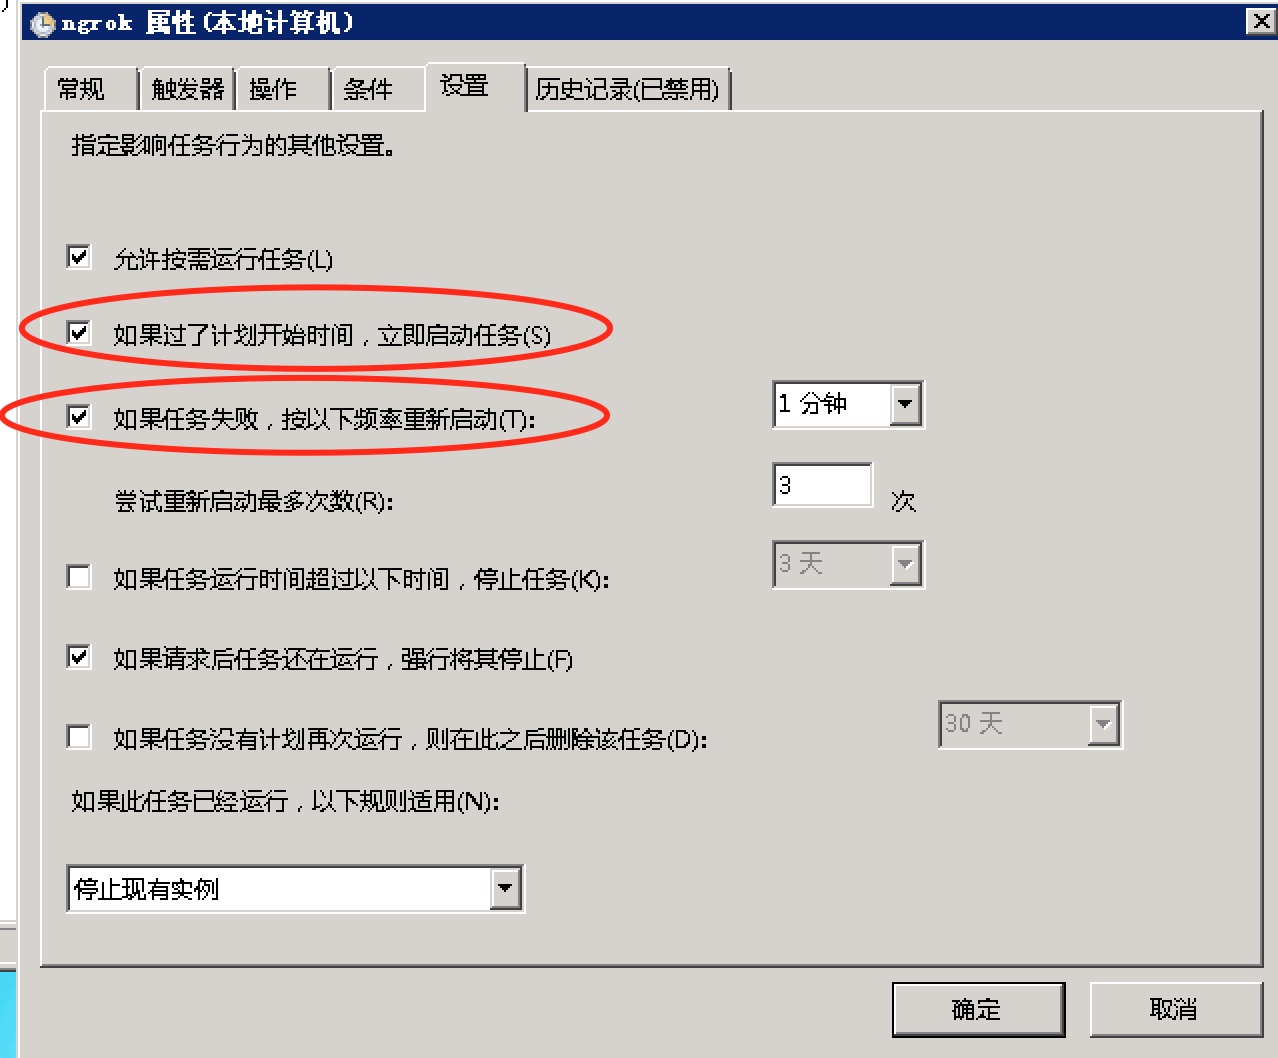
客户端开机自启
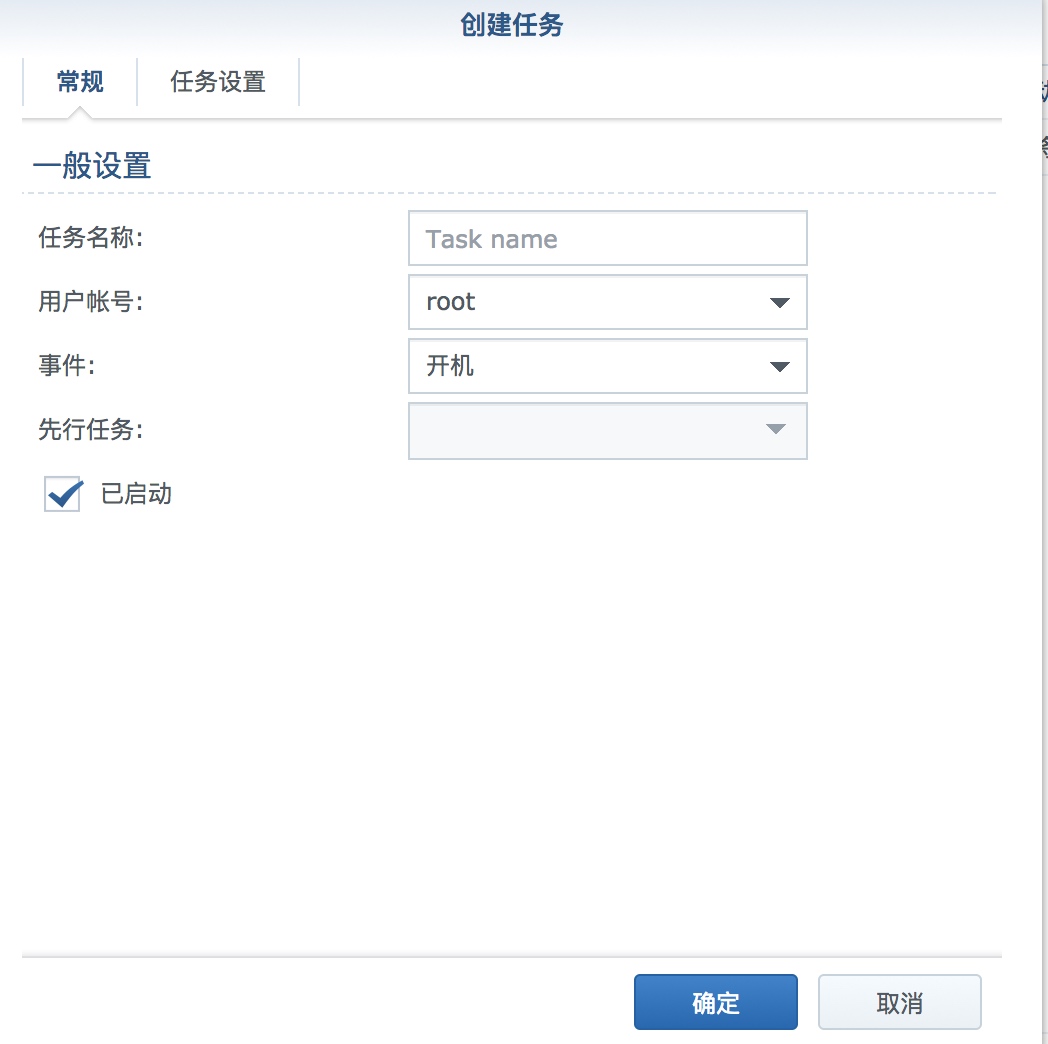
新建计划任务
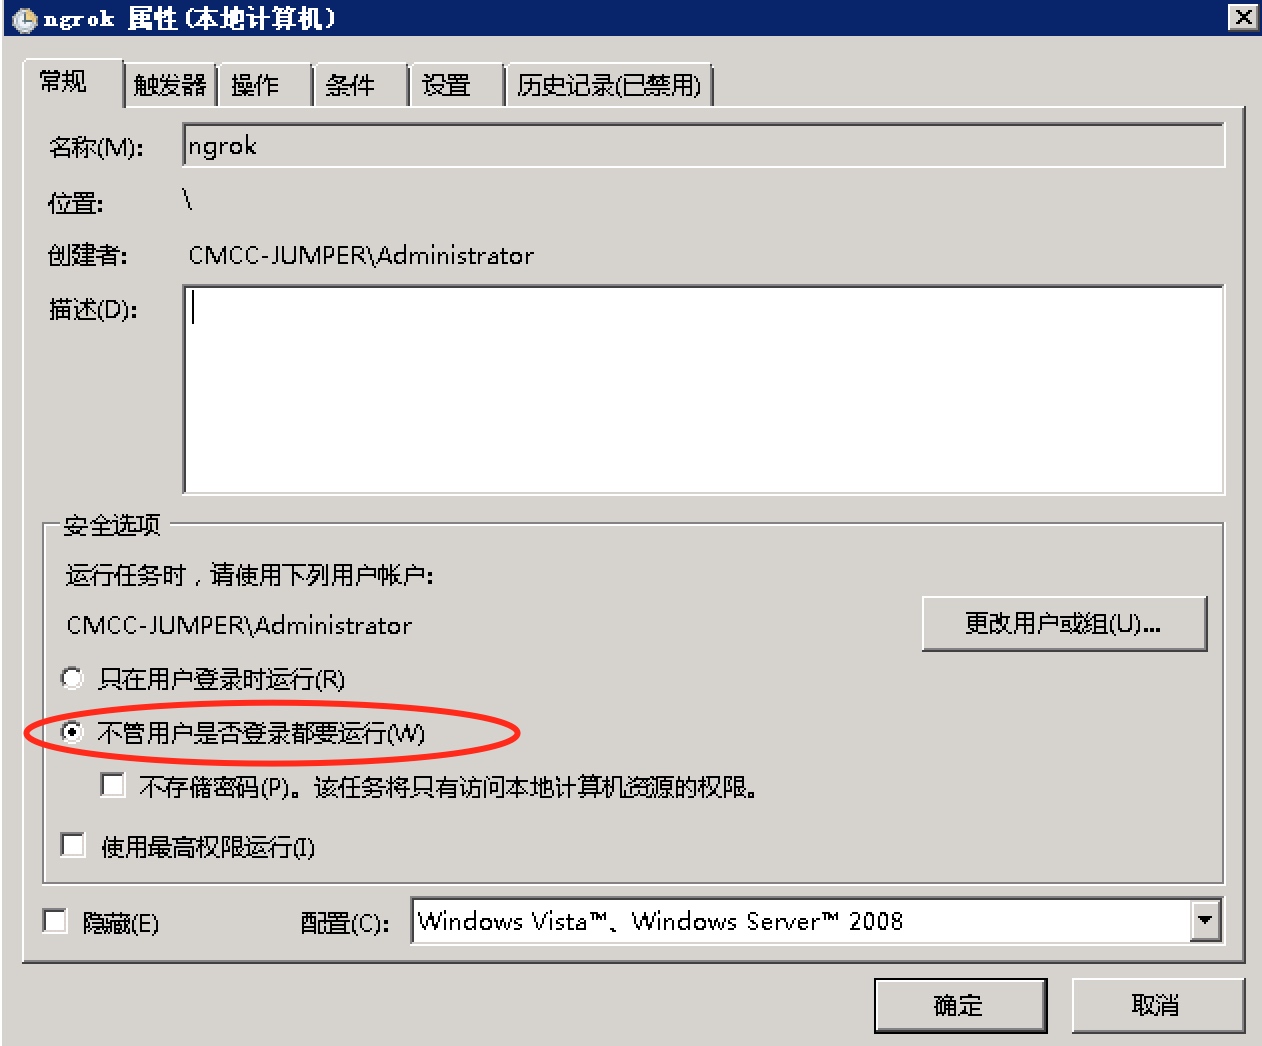 


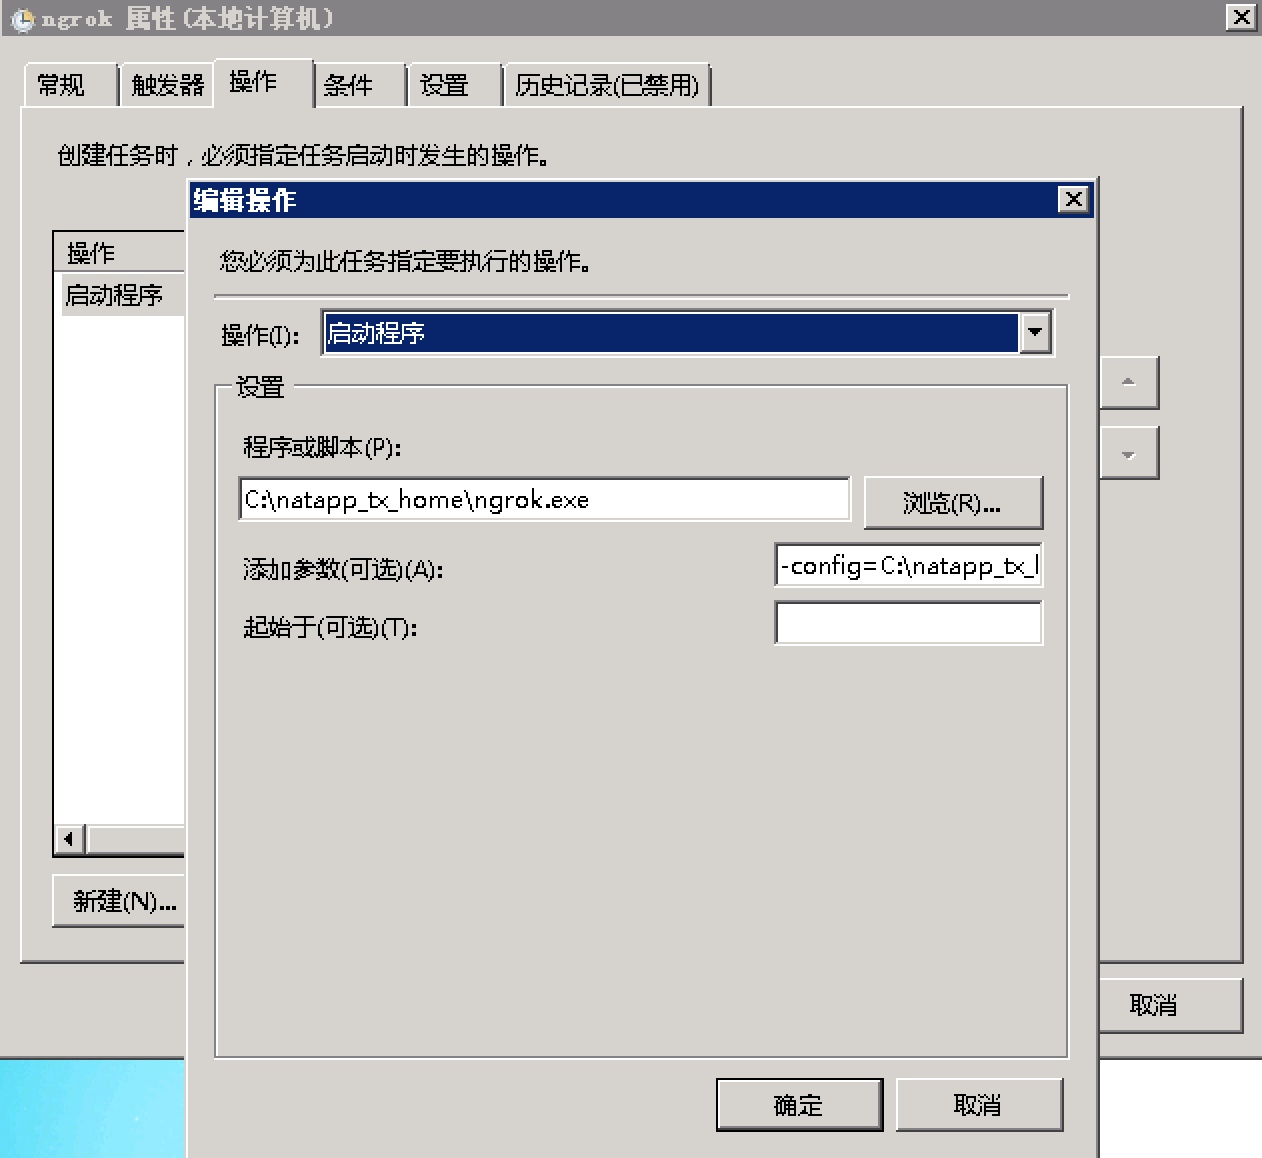 

启动程序:
C:\natapp_tx_home\ngrok.exe
添加参数:
-config=C:\natapp_tx_home\ngrok.conf start mstsc

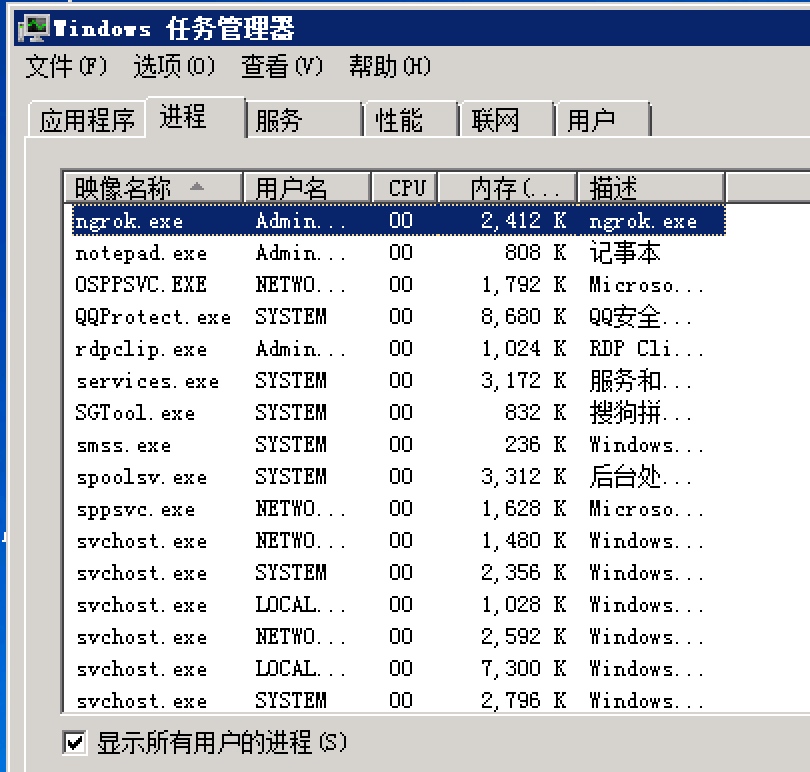
重启后查看任务管理器内是否有该进程

群辉上部署ngrok客户端
群辉分arm和x86的
如果是x86的内部系统是linux 64x 所以将编译好的linux 64x客户端先上传进群辉的共享文件夹
如果是arm的需要编译arm版本的客户端
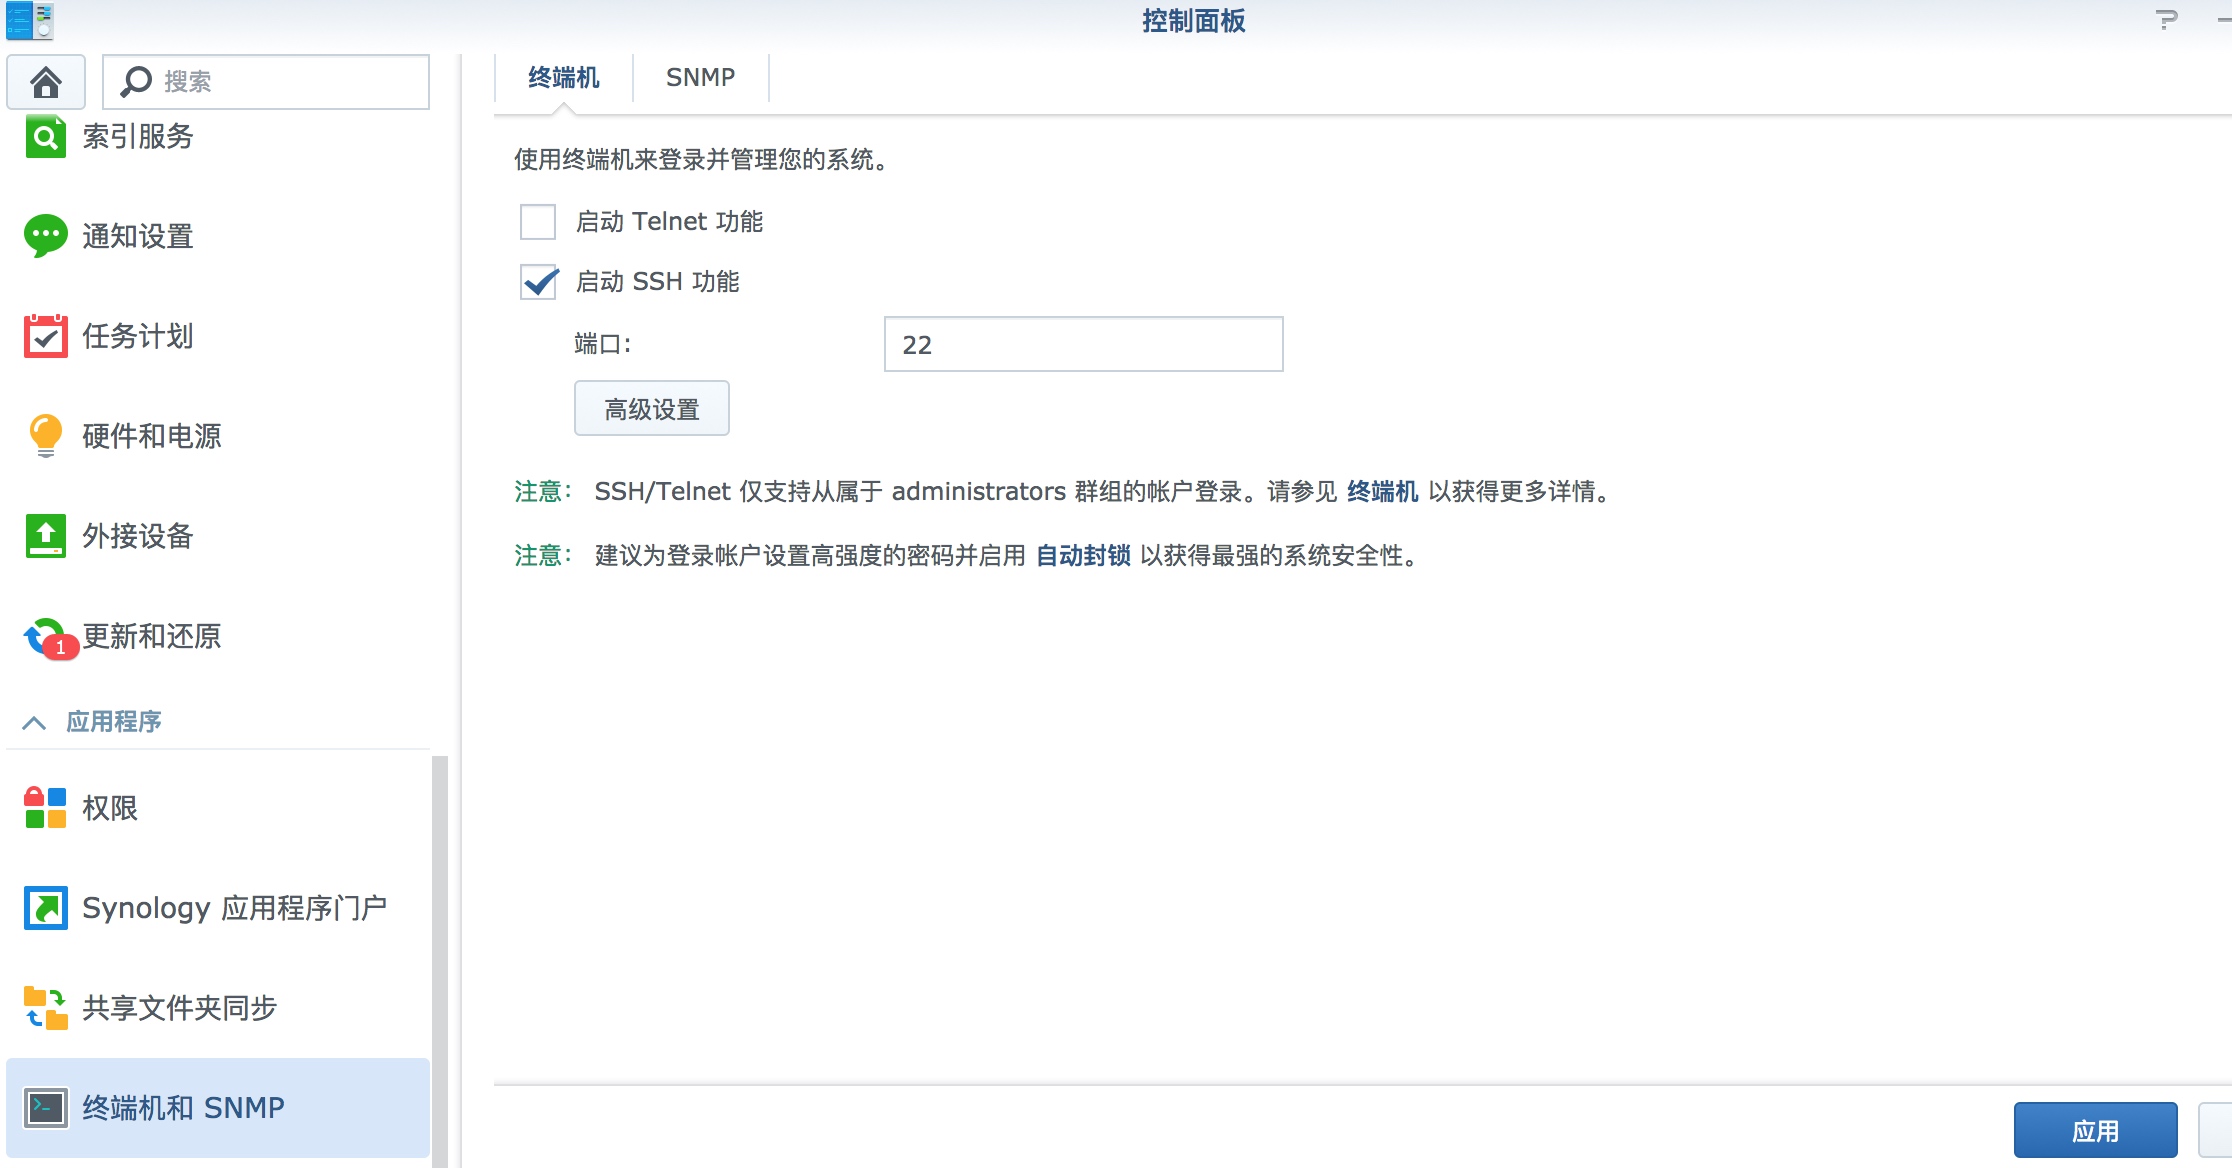
打开群辉的ssh功能

获取root权限
使用ssh登录到群辉用户使用admin账户
登录后输入命令并输入密码切换到root账户
sudo -i
修改root账户密码
synouser --setpw root passwd
在root账户目录下新建一个文件夹,复制前面传到共享目录的ngrok的客户端到该文件夹
然后按照windows下使用ngrok客户端的方式配置linux客户端启动并测试
有的群辉无法使用&命令让ngrok在后台正常使用这个时候需要使用到群辉的任务计划功能
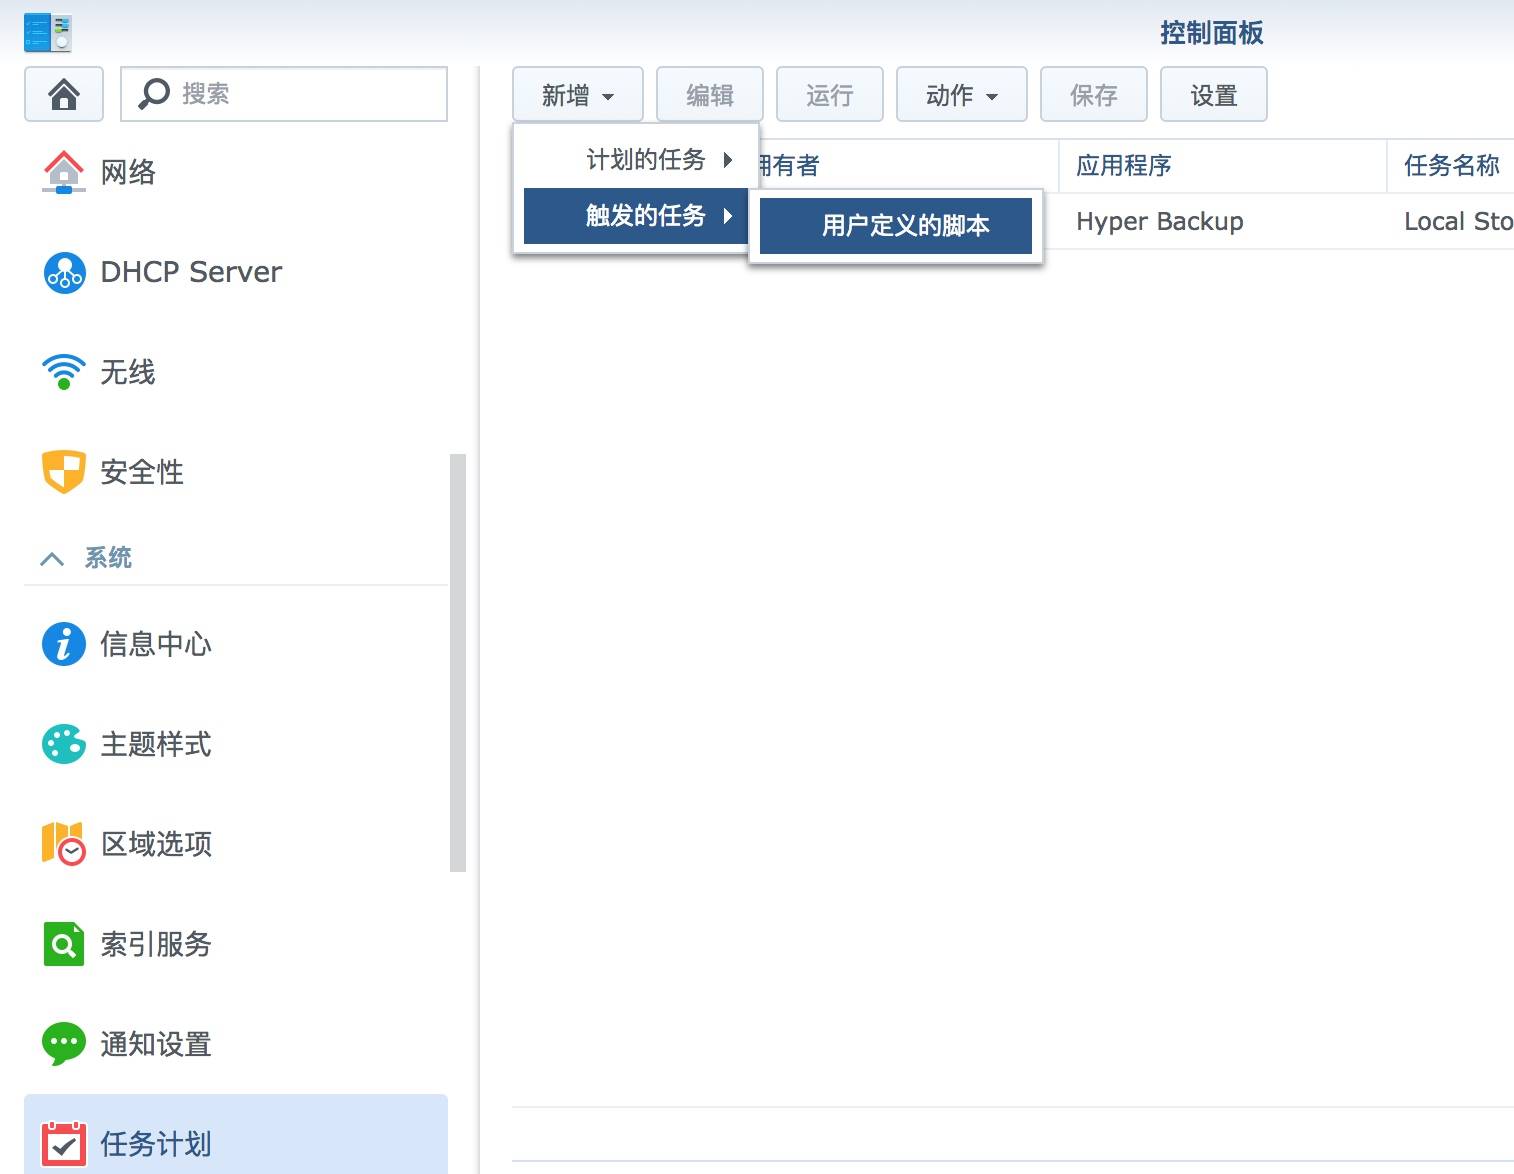 


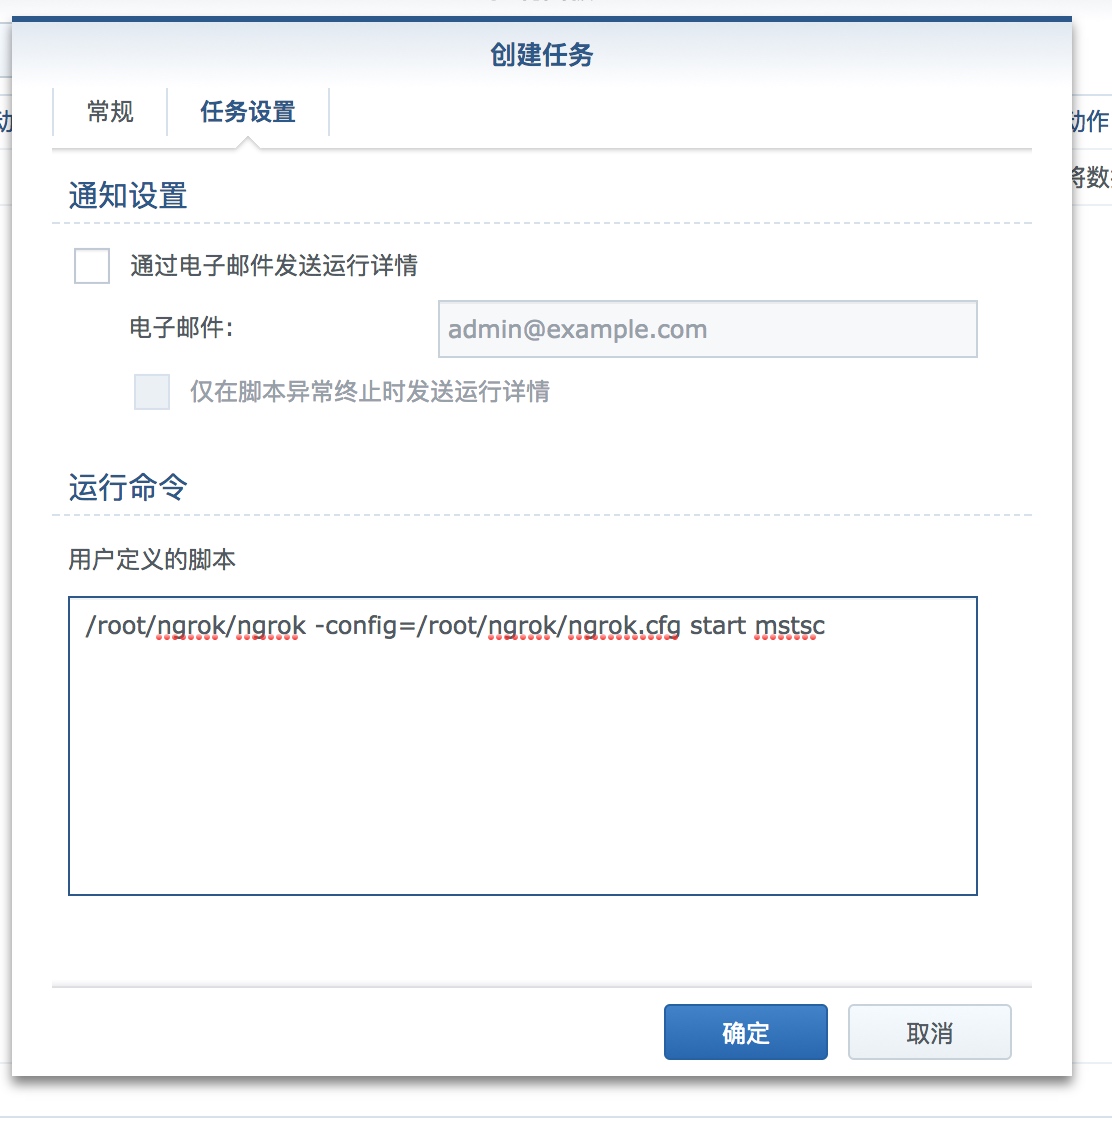 

注意,脚本命令要写完整路径
/root/ngrok/ngrok -config=/root/ngrok/ngrok.cfg start mstsc
然后直接按运行并在ssh查看后台是否正常运行以及是否网页能否从外网域名正常打开
ps -ef | grep ngrok
如果有包下不了可以使用该文件
链接: http://pan.baidu.com/s/1jIQNBim 密码: 3419